

As we head towards the 50th anniversary of Star Wars, and then race towards the 50th anniversary of Star Wars action figures, I thought readers would appreciate a deep dive into how those original Star Wars figures were made. In the first of these features, I’d like to look at Star Wars sculpts, the first 3D stage in the creation of an action figure.
It’s important to understand that very few original sculpts have survived and indeed, not all sculptors used the same methods or materials to create figures. For example, if a sculpt is known to have survived in acetate form then it is very unlikely a wax equivalent would be made. theswca is an excellent resource for checking what is known to exist, as some questionable pieces have been seen over recent times.
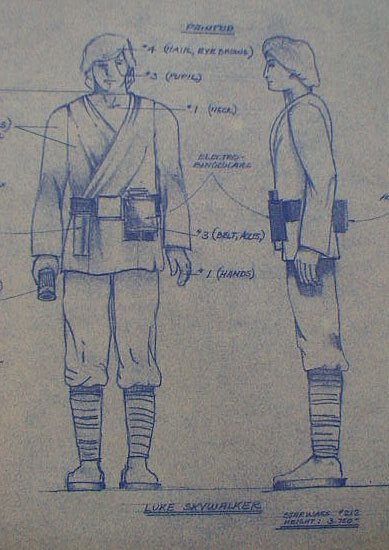 Although Kenner had internal sculptors around the time the first 12 action figures were being designed, it’s likely that they outsourced most of the requirements for sculpting to third parties, whether these were freelance sculptors or part of a design studio. Upon receipt of 2D drawings, or blueprints, which often contained additional notes then the sculptor would get to work. The sculptor would attempt to make a realistic version of the 2D design at the same time as understanding the toy making process and cost ramifications of any additional features. As seen here in this Luke Skywalker blueprint, some features didn’t make it into 3D designs, such as the excessive moulded accessories on the belt.
As already stated, not all sculptors worked in the same way and depending on the method there may be more revisions of some sculpts than others. First, we’ll look at the clay sculpts or “roughs” as they are known.
The Clay “Roughs” or Sculpts
 Clay is a very cheap material and has the advantage over wax in that it can be easily modified when soft or hard, but is more durable when hardened. A sculptor may create a very rough clay sculpt in order to receive early feedback on the design before performing any alterations or moving to the next stage, but clay cannot be used to show the fine details needed for the later hardcopies or final figures.
When working with clay, some sculptors would create a wire frame skeleton of larger pieces, such as the torso, to give more support to the final sculpt.
Once the clay is “signed off” then a silicone mould would have been made of the figure to allow a rough wax sculpt to be made. This has the additional benefit in that a sculptor could always go back to a previous version by casting another rough wax sculpt if needed. The rough wax sculpt at this stage is far from the finished wax sculpt that most collectors know.
The Wax Sculpt
When we arrive at the wax sculpt stage there are also different pathways and methods that the sculptors could take to arrive to the finished wax sculpt. For example, if working from scratch in wax, the sculptor would start with a block of wax, rough out a shape and then use heated scalpels and other tools to finely carve out the parts adding detail as needed. Unlike the clay roughs, separate pieces of wax were used to create the figure such as torso, left arm, right arm, left leg and right leg. The wax used is a special material created for sculpting; don’t think for a second these guys worked with candles! The benefit of wax is that is allows for finer details to be added without distorting other features of the figure such as would happen in clay. Another benefit of wax is that if any errors or improvements were needed to be made, then a new piece of wax could be heated, placed onto the sculpt and reworked as necessary.
If working from a rough wax cast made from the clay rough, then the sculptor would cut the limbs of each piece from the rough wax first and work on those independently to get to the same stage as above.
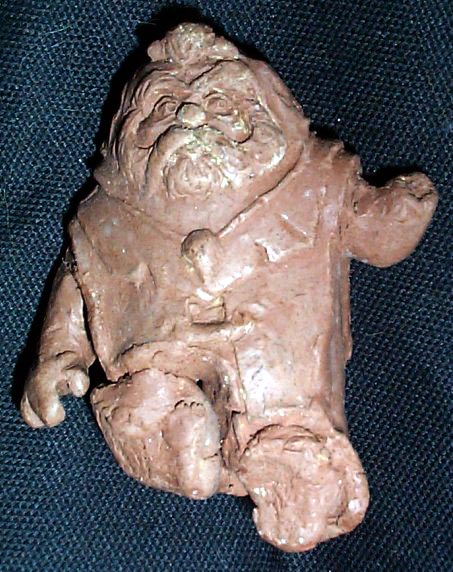
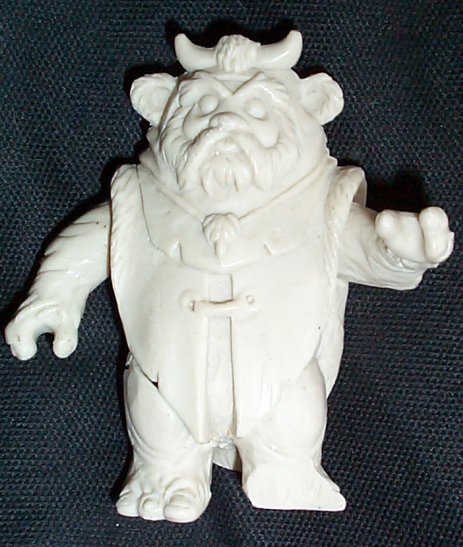
It is not unusual for sculptors to repeat the process of making moulds of the initial rough parts and casting more wax sculpts, each iteration getting closer to the final creation. Again, the major benefit of this was being able to go back to a previous work if needed, whether this was to rectify a mistake or act upon given feedback to the designs. As you can see from the two images below, there’s a distinct difference in the first wax cast from a mould made of clay versus a later mould made of wax.
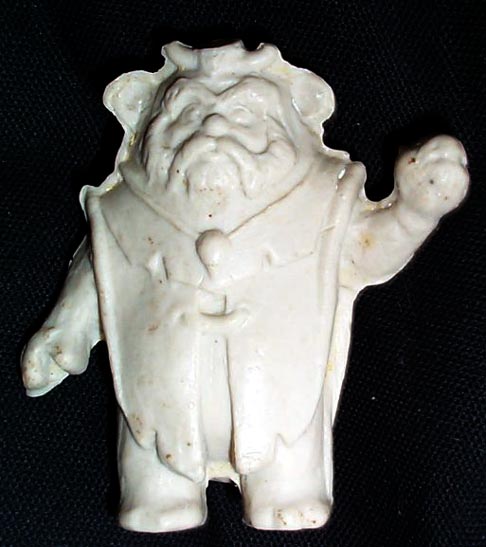
Notice on the left that the wax sculpt contains “flashing” around the edges. This is where material will seep through a join where the two parts of the mould go together and would need to be trimmed or machined away if it was a hard material, such as metals in diecasting.
 It’s really important to highlight that sculptors are highly skilled artists and they are manually refining their creations at this stage. Although many of the wax sculpts would have been reused or melted down, to keep the silicon moulds in shape or for new projects for example, I can completely understand why a sculptor would want to keep their sculpt. There was certainly no need to keep them for collectors decades in the future!
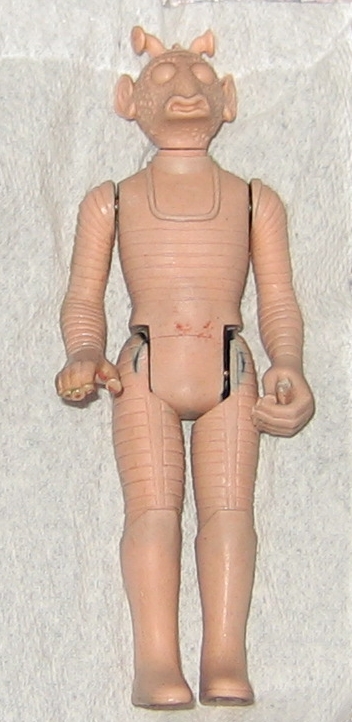
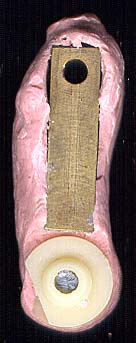
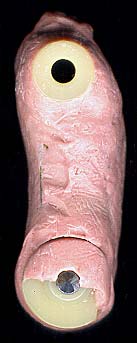
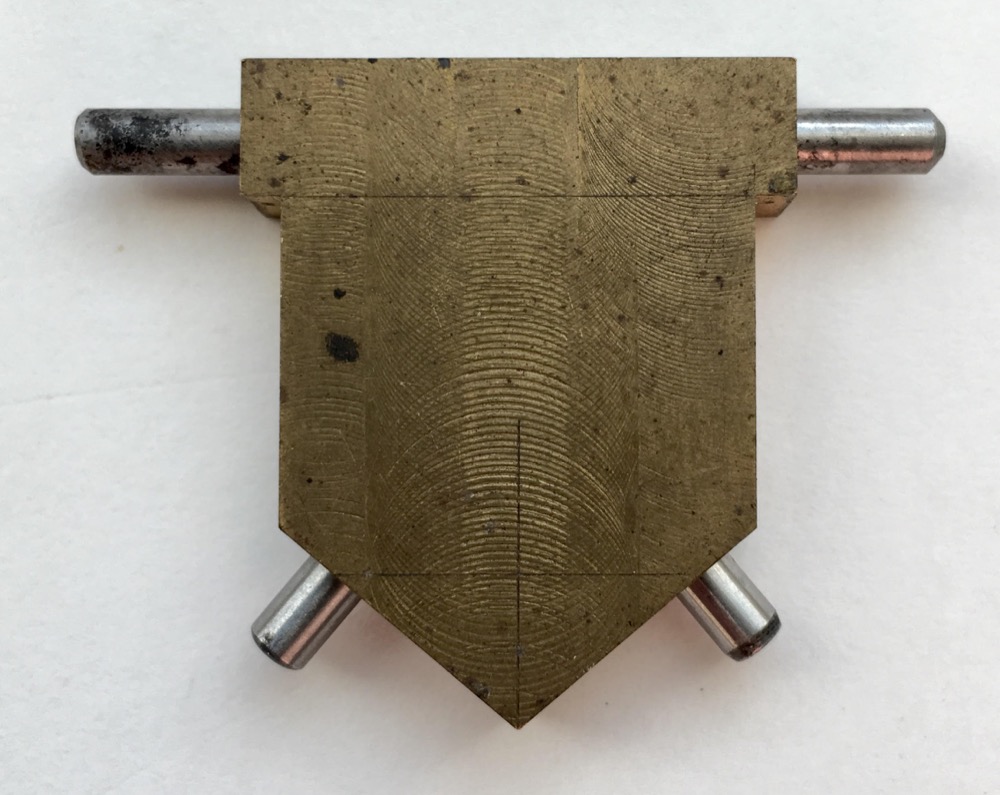
On the right is a surviving wax sculpt of Greedo owned by Gus Lopez. The detail really pops on this sculpt and it is a joy to see a figure surviving from this stage in the process. If you look closely, you seen see metal pins which are used to keep the limbs in place to show articulation. The images below show how plastic discs were used to not only keep the articulation but to also prevent damage to the wax. Inside the wax torso is a piece of brass known as a “buck” which helps protect the core of the figure and to ensure that the sculpt remained in the correct proportion.
Depending on the character being created, then there may already be a basis for the wax sculpt. As detailed on a theswca blog post, some figures closely resemble each other so why not reuse what was already there? As said in the post, for a skilled sculptor, taking an already created and no longer needed wax sculpt, adding a bit more melted wax and then re-carving would save a lot of time.
Acetate Sculpts
 Bill Lemon was one noticeable exception to the sculptors who followed the steps above as he chose to sculpt in acetate. Bill would have used a manual milling machine to create the action figure pieces before using a tool similar to a dremel drill to hone the detail. As a former CNC Miller/Turner, I can only admire the craftmanship that would have gone into this and can confidently say that this is very much a highly-skilled manual craft that future computer controlled machines would have struggled to create without a lot of coding.
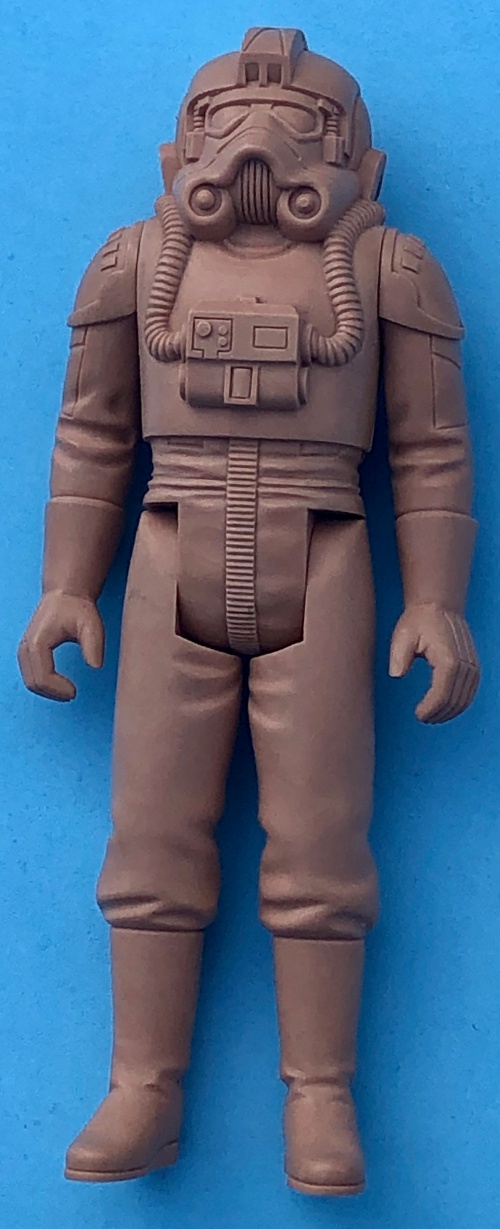
Of all of the sculpts I’ve looked at during this research, the AT-AT Driver is the one that stands out the most for me. This type of material is perfect for figures with harsher lines, such as the droids and imperial armour. It’s far more difficult producing a human face in a harsh material such as acetate over a softer material such as wax.
 Although many of Bill’s sculpts didn’t require alteration, there’s evidence to show that wax was used to make changes where needed. As stated previously, this is one of the main benefits of wax whereas it’s impossible to add acetate back to an acetate sculpt.
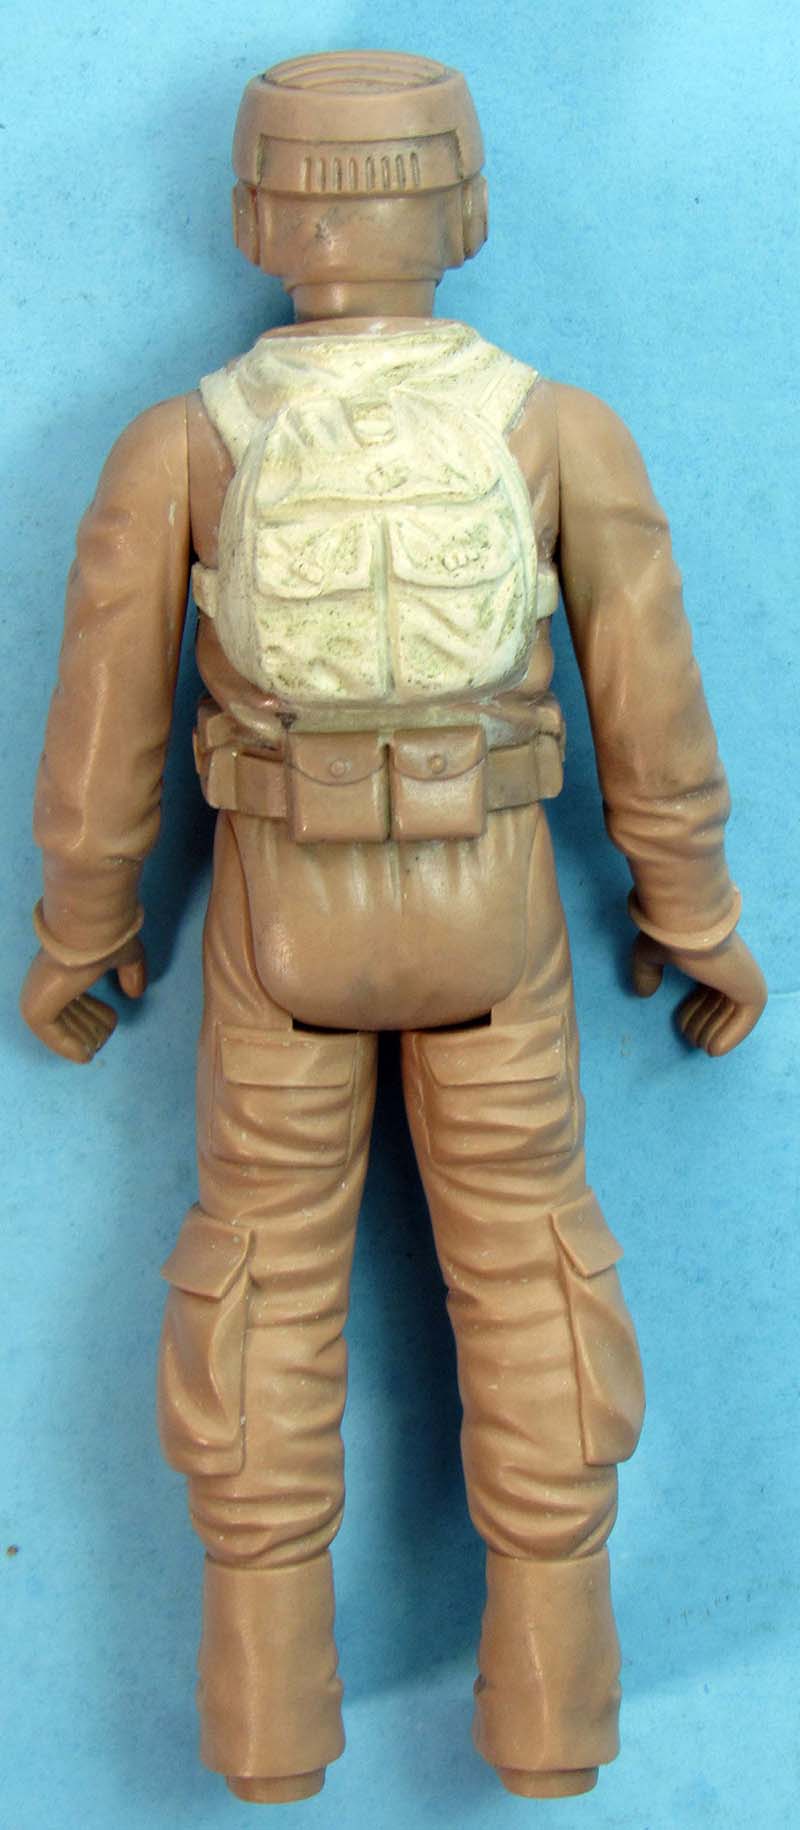
The Rebel Commando on the right is one such example of an adaption made with wax. At some point, a Kenner employee would have asked for the backpack to be adapted, or even included if one was not there, and another sculptor would have added the wax.
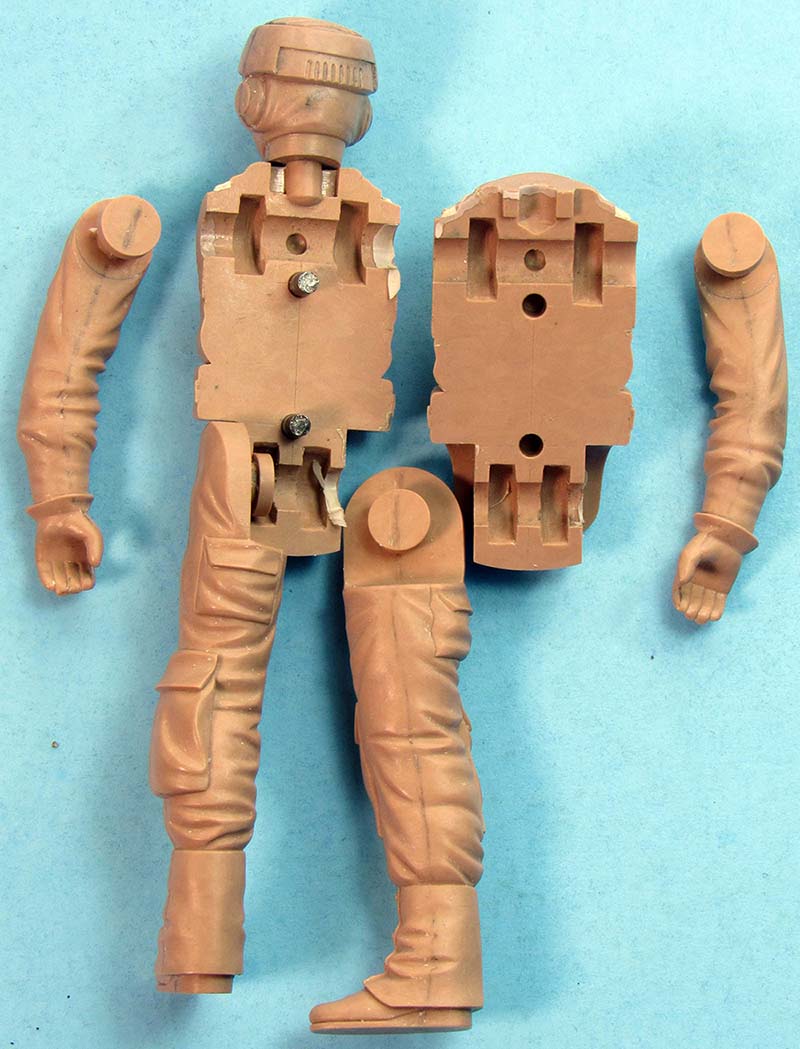
As acetate is a much more durable material than wax, the brass buck, metal pins and plastic discs were not needed to hold the figure together. This amazing photograph shows how the sculpt would have been held together and shows that the torso was made as two separate parts.
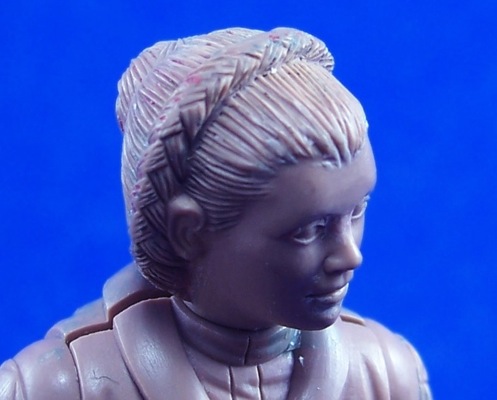
Finally, I don’t think it is fair to talk about Bill’s work without showing the Hoth Leia action figure. The sculpting of the hair and hairband is not only outstanding but it also shows how Bill could represent a softer human likeness through his craftmanship.
Whichever process a sculptor followed, Kenner were involved throughout to ensure that the finished product met their specification. Photographs would have been sent regularly to Kenner who would make note sheets to send back to the sculptor. These photographs could also be used by other departments, such as marketing to show retailers how the finished products may look. We’re truly fortunate in that not only do some of these pieces exist, but also other collectors are willing to share their knowledge and photographs for other collectors to enjoy.
I hope you enjoy this little roundup. Next time, we’ll look at silicon moulds. In the meantime, check out many more sculpts on theswca.
Photos (c) theswca.com, Ron Salvatore, Gus Lopez, Chris Georgoulias, Tracey Hamilton, Todd Chamberlain.
Special thanks to Chris Fawcett and his knowledge on the creation of Star Wars action figures. Any inaccuracies are entirely down to the author.